
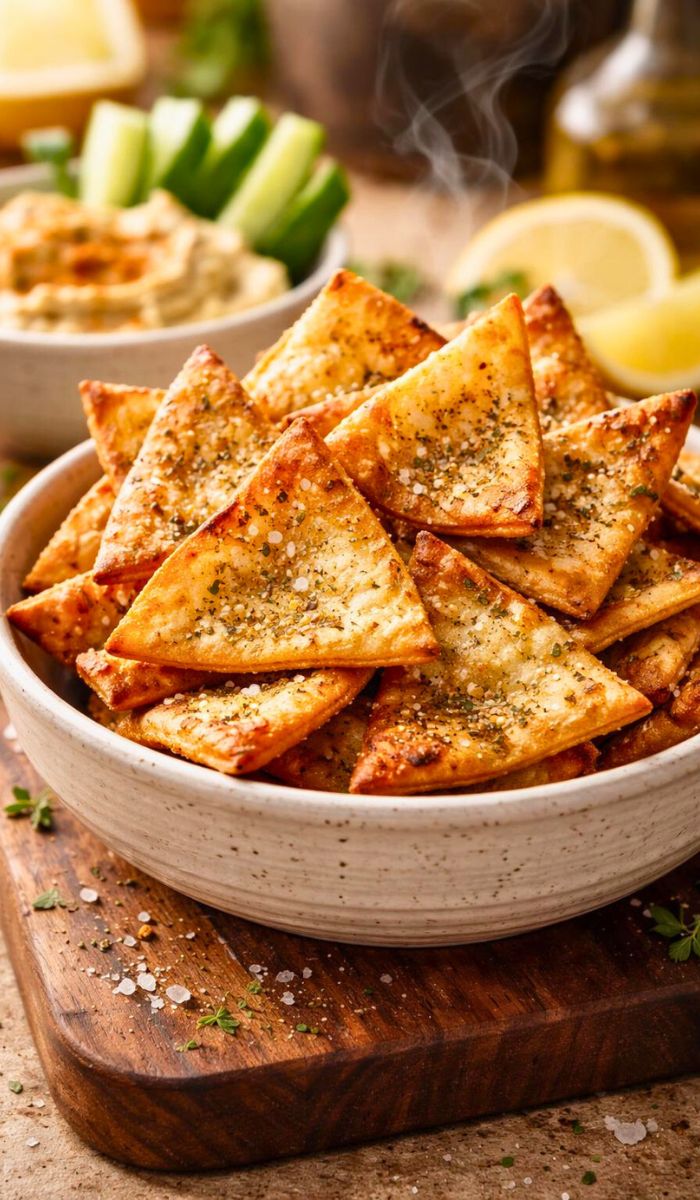
Love crispy snacks? Try this easy Cava Pita Chips Recipe. It tastes just like the ones from Cava restaurant. Perfect for parties or movie nights. This how to make Cava Pita Chips guide uses simple ingredients.
Bake them golden and crunchy. Dip in hummus or eat alone. Ready in under 30 minutes. Your family will ask for more!
My Story With This Comforting Cava Pita Chips
I first tried Cava Pita Chips on a busy weeknight. Grabbed takeout from Cava after work. Those chips stole the show. Crunchy outside and soft inside. I thought, “I can make this at home!”
Next day, I baked my first batch. Burned a few and but soon nailed it. Now it’s my go-to snack. Reminds me of cozy evenings with friends. Share this Cava Pita Chips Recipe with your loved ones. It brings smiles every time.
Equipment List
- Baking sheet
- Parchment paper or foil
- Sharp knife or pizza cutter
- Large mixing bowl
- Pastry brush or spoon
- Oven mitts
- Measuring cups and spoons
Recipe Overview
- Recipe Name: Cava Pita Chips Recipe
- Servings: 6
- Prep Time: 10 mins
- Cook Time: 15 mins
- Total Time: 25 mins
- Course: Snack
- Cuisine: Mediterranean
- Calories: 150 kcal per serving
Ingredients for Cava Pita Chips
- 6 large pita breads (white or whole wheat)
- 1/4 cup olive oil
- 1 teaspoon garlic powder
- 1 teaspoon dried oregano
- 1/2 teaspoon sea salt
- 1/4 teaspoon black pepper
- Optional: 1/2 teaspoon paprika for extra kick
These are the key ingredients for Cava Pita Chips. Simple pantry staples. No fancy stuff needed.
Instructions for Cava Pita Chips
1. Preheat the Oven
Set oven to 375°F (190°C). Line baking sheet with parchment paper. This stops sticking. Takes 2 minutes. Get ready to bake crispy chips.
2. Cut the Pita Breads
Take pita breads. Cut each into 8 wedges with knife or pizza cutter. Like slicing a pizza. Place wedges in large bowl. Do this for all pitas. Even sizes bake best.
3. Mix the Seasoning Oil
Pour olive oil into bowl with pita wedges. Add garlic powder, oregano, salt, pepper, and paprika. Toss gently with hands. Coat every piece well. Oil makes them crispy. Smells amazing already!
4. Arrange on Baking Sheet
Spread pita wedges in single layer on sheet. No overlapping. This ensures even baking. Use two sheets if needed. Brush extra oil on top if dry spots show.
5. Bake Until Golden
Bake for 12-15 minutes. Flip halfway with spatula. Watch closely after 10 minutes. Edges turn golden brown. Perfect crunch without burning.
6. Cool and Serve
Remove from oven. Let cool 5 minutes on sheet. They crisp more as they cool. Serve warm. Enjoy your homemade Cava Pita Chips Recipe!
Cooking Tips and Simple Recipe Variations
- Use room temperature pita for easier cutting.
- Don’t skip flipping; it crisps both sides evenly.
- For spicier chips, add cayenne pepper to oil mix.
- Variation: Lemon zest and za’atar for bright flavor.
- Whole wheat pita adds fiber; great for healthy snacking.
- Bake less for softer chips, more for extra crunch.
- Store-bought pita works fine; fresh tastes best.
- Air fryer option: 350°F for 8-10 minutes, shake halfway.
Little History Behind This Comfort Food
Pita chips trace back to ancient Mediterranean kitchens. Pita bread started in the Middle East over 4,000 years ago. Flat and pocket-like, perfect for dipping. Cava restaurant modernized it.
They bake thin pita with olive oil and herbs. Inspired by Greek and Turkish meze. Now, it’s a global snack star. This Cava Pita Chips Recipe honors that tradition. Simple and tasty and timeless.
What to Serve With This Dish
Pair with creamy hummus for classic dip. Tzatziki adds cool yogurt tang. Try guacamole for fusion twist. Fresh veggies like cucumber sticks work great. Serve at parties with falafel. Or solo with soup. Endless options!
Occasion or Event Ideas
Game day watch parties. Chips disappear fast. Family movie nights. Kids love the crunch. Summer picnics. Pack in bags. Holiday appetizers. Festive with dips. Backyard BBQs. Healthy crowd-pleaser. Date nights in. Impress with homemade touch.
Storage and Reheating Tips
- Store in airtight container at room temp up to 3 days.
- Freeze baked chips in zip bag for 1 month.
- Reheat oven at 350°F for 5 minutes to crisp.
- Microwave 10-15 seconds; watch for sogginess.
- Avoid plastic bags; they make chips soft.
Nutrition Information
| Nutrient | Amount per Serving |
|---|---|
| Calories | 150 kcal |
| Total Fat | 7g |
| Saturated Fat | 1g |
| Carbohydrates | 20g |
| Fiber | 2g |
| Protein | 3g |
| Sodium | 300mg |
Values based on 6 servings. Using whole wheat pita boosts fiber.
Is This Dish Good for You?
Yes, this Cava Pita Chips Recipe is a smart snack choice. Olive oil brings healthy fats for heart health. Herbs like oregano add antioxidants. Whole wheat option gives fiber for digestion.
Lower calories than fried chips. Bake, don’t fry, cuts oil use. Portion control keeps it balanced. Great alternative to store-bought. Enjoy guilt-free!

Cava Pita Chips Recipe
Ingredients
- 6 large pita breads white or whole wheat
- 1/4 cup olive oil
- 1 teaspoon garlic powder
- 1 teaspoon dried oregano
- 1/2 teaspoon sea salt
- 1/4 teaspoon black pepper
- Optional: 1/2 teaspoon paprika for extra kick
Instructions
Preheat the Oven
- Set oven to 375°F (190°C). Line baking sheet with parchment paper. This stops sticking. Takes 2 minutes. Get ready to bake crispy chips.
Cut the Pita Breads
- Take pita breads. Cut each into 8 wedges with knife or pizza cutter. Like slicing a pizza. Place wedges in large bowl. Do this for all pitas. Even sizes bake best.
Mix the Seasoning Oil
- Pour olive oil into bowl with pita wedges. Add garlic powder, oregano, salt, pepper, and paprika. Toss gently with hands. Coat every piece well. Oil makes them crispy. Smells amazing already!
Arrange on Baking Sheet
- Spread pita wedges in single layer on sheet. No overlapping. This ensures even baking. Use two sheets if needed. Brush extra oil on top if dry spots show.
Bake Until Golden
- Bake for 12-15 minutes. Flip halfway with spatula. Watch closely after 10 minutes. Edges turn golden brown. Perfect crunch without burning.
Cool and Serve
- Remove from oven. Let cool 5 minutes on sheet. They crisp more as they cool. Serve warm. Enjoy your homemade Cava Pita Chips Recipe!
Notes
- Use room temperature pita for easier cutting.
- Don’t skip flipping; it crisps both sides evenly.
- For spicier chips, add cayenne pepper to oil mix.
- Variation: Lemon zest and za’atar for bright flavor.
- Whole wheat pita adds fiber; great for healthy snacking.
- Bake less for softer chips, more for extra crunch.
- Store-bought pita works fine; fresh tastes best.
- Air fryer option: 350°F for 8-10 minutes, shake halfway.
FAQs about Cava Pita Chips Recipe
Can I make Cava Pita Chips without an oven?
Yes! Use air fryer at 350°F for 8-10 minutes. Shake basket halfway. Or pan-fry in little oil over medium heat. Turn often for even crisp. Quick and easy how to make Cava Pita Chips at home.
Are these gluten-free?
Not with regular pita. Swap for gluten-free pita bread. Check labels for certified options. Seasoning stays the same. Perfect for gluten-free diets.
How long do they stay crispy?
Up to 3 days in airtight container. Humidity softens them. Revive in oven. Freezing works too for longer storage.
What if I don’t have oregano?
Use Italian seasoning or thyme. Even rosemary fits Mediterranean vibe. Adjust to taste. Experiment for your perfect Cava Pita Chips Recipe.
Can I add cheese?
Sprinkle parmesan before baking. Bake extra 2 minutes. Melty, cheesy twist. Kids adore it!
Final Thoughts
There you have it—your go-to Cava Pita Chips Recipe! So easy and anyone can whip it up. Crispy and flavorful and way better than store-bought. Next time friends visit and bake a batch.
Watch their faces light up. Share your tweaks in comments. Happy snacking, friends! What’s your favorite dip? Bake often and enjoy the crunch.

Hi! I’m Livy Lane, the creator of LivyCooks.com. I share easy, delicious recipes anyone can make at home. Let’s cook, taste and enjoy every bite together!